Supplier Bridge · Guide
How to export a Shopify purchase order to the CSV your supplier asks for
This guide is for merchants who already create purchase orders in Shopify and have a supplier who wants the order as a CSV file in a particular layout. It covers what Shopify itself offers, how to decide whether that is enough, and how to produce a supplier-specific CSV from an existing purchase order without re-entering it.
Published by zFinia on 2 October 2026. Shopify documentation checked 2 October 2026.
First, be clear which kind of order you mean
Shopify has two different things called orders, and their exports are unrelated.
- Customer (sales) orders are what your customers buy from you. Shopify can export them as a CSV from the Orders page, including line items, payment details and addresses. See Exporting orders. That export is for your own records and contains customer data; it is not something to send a supplier.
- Purchase orders are what you buy from your suppliers. In Shopify they live under Products → Purchase orders. This guide is only about purchase orders.
What Shopify offers for purchase orders today
Before adding any tool, check whether Shopify's own options already cover your supplier. According to the Shopify Help Center, as retrieved on 2 October 2026:
- You create a purchase order from Products → Purchase orders → Create purchase order, choose a supplier and destination, and add products with quantity, supplier SKU, cost and tax. If you've ordered a product from that supplier before, the supplier SKU, cost and tax are filled in from previous purchase orders; if there is no supplier SKU on file, the variant's SKU is used by default. (Creating purchase orders)
- You can export a purchase order as a PDF from the order page: More actions → Export PDF. Shopify describes this as a way to submit the order to your supplier or keep it for your records. (Same page.)
- You can add products to a purchase order in bulk by importing a CSV file that identifies variants by SKU, barcode or both, with optional cost and tax. This is an import into a purchase order, not an export of one. (Same page.)
- A purchase order starts as a draft and is marked as ordered once it's submitted to the supplier; receiving happens on an inventory transfer linked to the order. (Purchase orders)
- The purchase order list can be searched, filtered, sorted and saved as custom views. (Viewing purchase orders)
- Shopify's Stocky migration guide links a purchase order cost report that breaks down ordered quantity and supplier cost by purchase order, SKU and supplier SKU, and reports in Analytics can be exported as CSV, XML, JSONL or Parquet. That is a reporting export with Shopify's own column names. (Migrating from Stocky, Exporting reports)
If your supplier accepts a PDF purchase order by email, Shopify's Export PDF may be all you need. Shopify's documentation can change, so check the linked pages for the current behaviour.
When a supplier needs their own CSV layout
Some suppliers import orders into their own system or portal and publish an upload specification. Typical requirements are:
- Exact column names, such as "Item Code" rather than "Supplier SKU".
- A fixed column order.
- A column that holds the same value on every row, such as your customer account number with that supplier.
- A particular delimiter, such as a semicolon instead of a comma.
- With or without a header row.
A PDF can't be imported, and a report export uses Shopify's column names and layout. In those cases merchants often copy the order into a spreadsheet and rearrange it by hand for each order. The rest of this guide shows how to produce that supplier-specific file directly from the existing purchase order.
Step by step with Supplier Bridge
- Create the purchase order in Shopify as you normally do. Add your supplier's SKU on each line if your supplier identifies products by their own code.
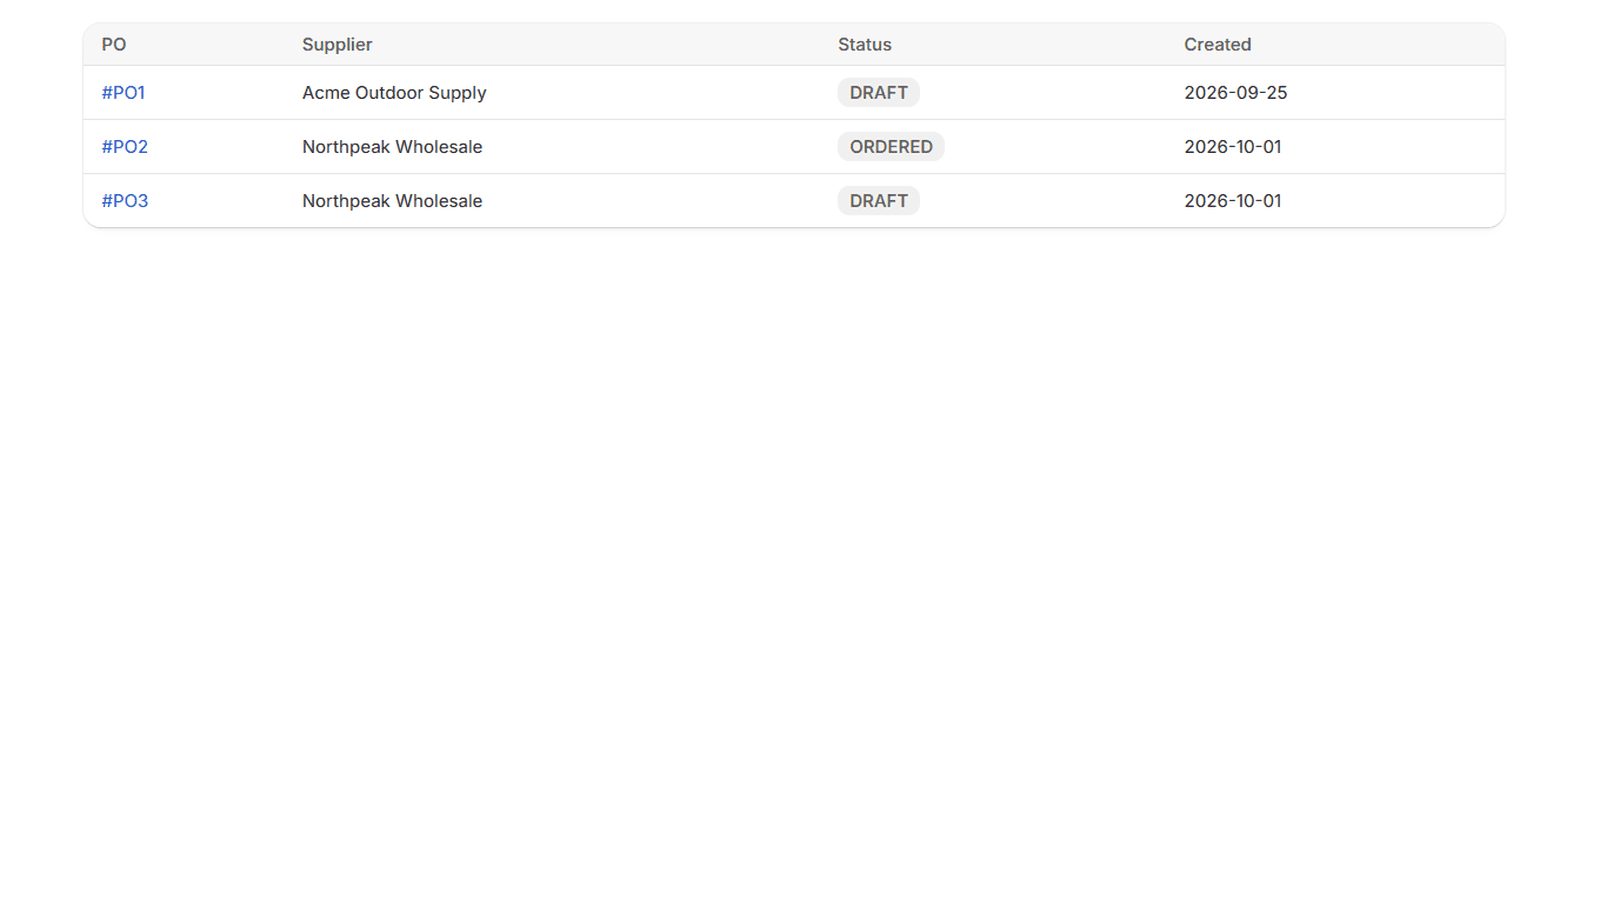
- In Supplier Bridge, open the purchase order list. It shows the native purchase orders already in your store, with supplier, status and created date.
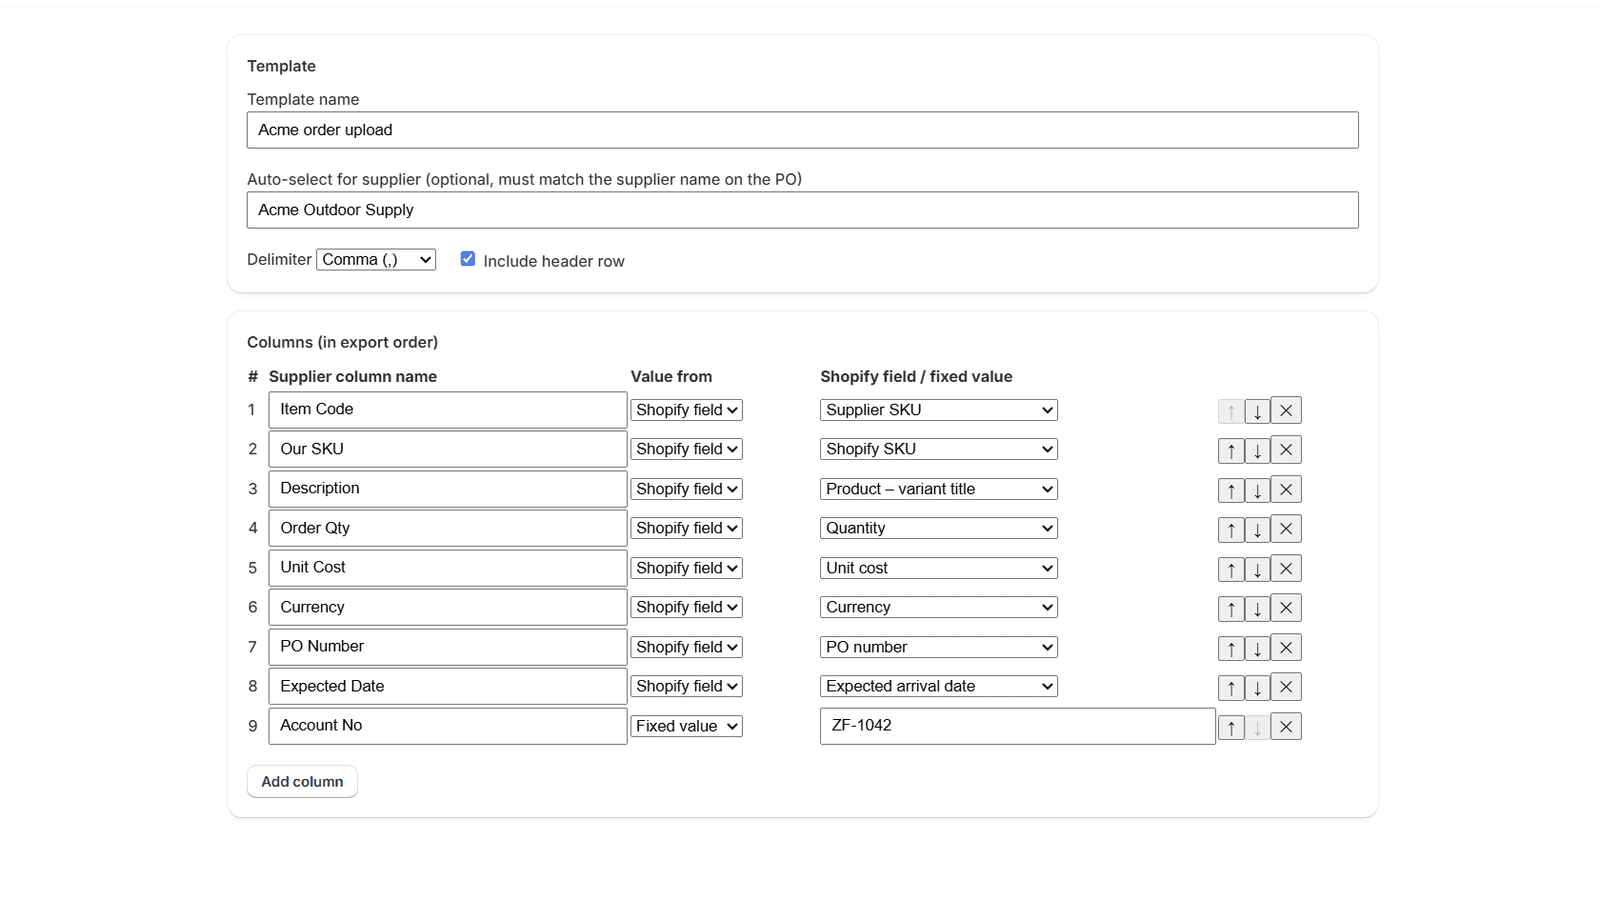
- Create a supplier template: enter the supplier's column names exactly as their specification spells them, put them in their order, and choose which purchase-order field fills each one. Add fixed-value columns for anything that is the same on every row.
- Choose the delimiter (comma, semicolon, tab or pipe) and whether to include a header row.
- Optionally set the supplier name the template should be auto-selected for. It must match the supplier name on the purchase order.
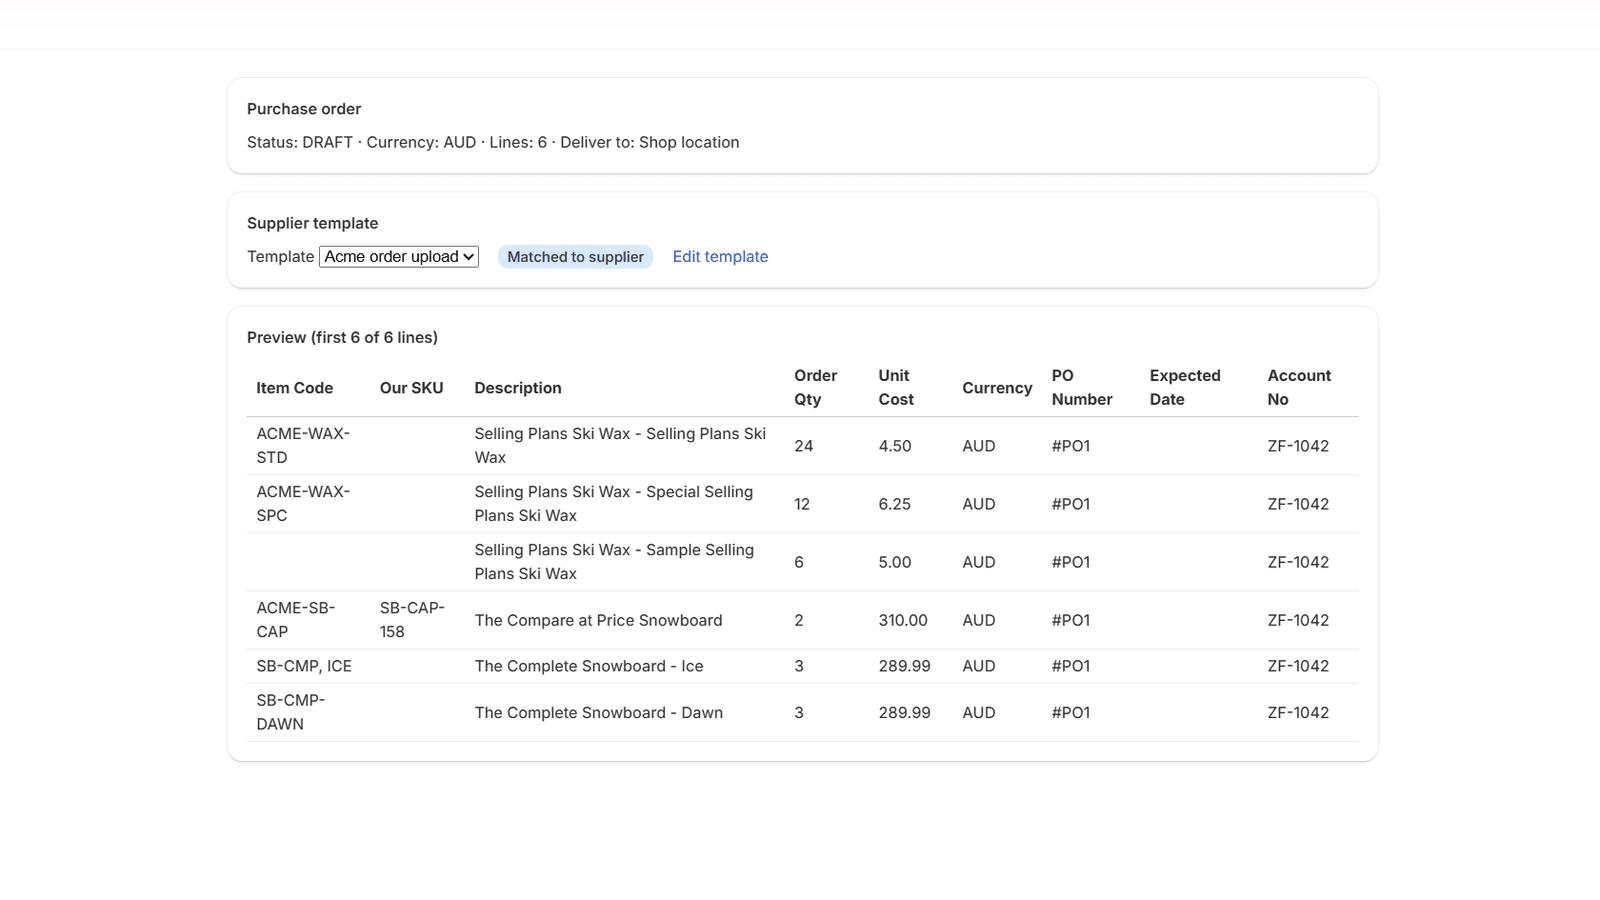
- Open the purchase order. The matching template is selected, and a preview shows the first rows exactly as they will be exported.
- Compare the preview with the supplier's specification, then choose Download CSV and send or upload the file through the supplier's normal process.
A sample file
This is a fictional example of a file produced with a nine-column template like the one above. The supplier, codes and account number are invented.
Item Code,Our SKU,Description,Order Qty,Unit Cost,Currency,PO Number,Expected Date,Account No
NP-TENT-2P,TENT-2P-GRN,Trail Tent 2P - Green,8,142.50,AUD,#PO7,2026-10-20,ACC-0042
NP-STOVE-01,STOVE-01,Camp Stove,12,38.00,AUD,#PO7,2026-10-20,ACC-0042
"NP-MUG, BLUE",MUG-BLU,Enamel Mug - Blue,48,4.25,AUD,#PO7,2026-10-20,ACC-0042- Amounts are plain decimals with a full stop, no currency symbol and no thousands separator, rounded to the currency's minor units.
- Dates are written as YYYY-MM-DD.
- A value that contains the delimiter, a quote mark or a line break is wrapped in double quotes, as in the third row.
- Files are UTF-8 with Windows-style (CRLF) line endings.
Supported fields
| Field | Where the value comes from |
|---|---|
| Supplier SKU | The supplier SKU on the purchase order line |
| Shopify SKU | The SKU of the line's inventory item |
| Product title, variant title, or both | The product and variant on the line |
| Quantity | The ordered quantity on the line |
| Unit cost and line total | The line's unit cost, and unit cost × quantity |
| Currency | The purchase order's currency |
| PO number | The purchase order's number, for example #PO7 |
| Ordered date | When the order was marked as ordered (or created, if it hasn't been) |
| Expected arrival date | The earliest carrier estimated arrival on a shipment for the order; blank until one exists |
| Supplier name, destination | The supplier and destination location names on the order |
| Fixed value | Text you type into the template, repeated on every row |
Nothing else is available: there are no customer fields, and the app does not invent values that aren't on the order.
Limits to know before you rely on it
- One purchase order per export. It is not a bulk or historical reporting tool.
- Orders up to 2,000 lines. Larger orders are refused with an explanation rather than truncated, and no export is used.
- CSV only. It does not produce XLSX files.
- If a template includes the expected date and an order has more than 10 transfers or shipments, the export is refused rather than guessing the date. Remove that column or use another template.
- The free plan includes 5 successful CSV exports in total per store; the paid plan is US$19 every 30 days for unlimited exports.
- A file your browser downloads is not proof your supplier's system accepts it. Test the first file with your supplier.
Handle the file safely
- Open the file in your supplier's system, or import it into a spreadsheet as text, rather than double-clicking it. Spreadsheet programs can change codes with leading zeros, long numbers and dates when they open a CSV directly.
- Values that start with =, +, - or @ can be interpreted as formulas by spreadsheet programs. Supplier Bridge doesn't change those values, because the supplier's system needs the original data. Before downloading such a file it lists the affected cells and asks you to confirm with "Download unmodified supplier CSV". The file is not sanitised and your supplier is not warned, so fix the source data in Shopify if a value shouldn't start that way.
- Send only what the supplier needs. A template only exports the columns you add to it.
Sources
Shopify pages cited above, as retrieved on 2 October 2026: